

අද මම මේ article එකෙන් කතා කරන්න යන්නේ open-source network monitoring tool එකක් වන LibreNms ගැන. මෙතැනදී මම විස්තර කරන්නේ LibreNms කියන්නේ මොකක්ද කියන එක සහ එක install කරන්නේ කොහොමද කියන එක.
What is libreNMS?
LibreNms කියන්නනේ cacti, Nagios වගේම network monitoring tool එකක්. එක GPLv3 යටතේ release කෙරෙන free and open-source tool එකක්. මේක ඇත්තටම user-friendly විදිහට හදල තියනවා. එක හින්දම LibreNms එක ඕනිම කෙනෙක්ට තෙරුන්ගන්න සහ use කරන්න ලේසියි.
LibreNms වැඩ කරන විදිහ සහ support එක ගැන සරලව කතාකරොත්, එකෙන් SNMP, LLDP, OSPF, ARP, CDP, BGP සහ FDP වගේ protocols use කරලා network එක auto-discover කරගන්නවා. ඒවගේම LibreNms use කරලා ගොඩක් network hardware (Cisco, Juniper, Foundry, FreeBSD, Brocade වගේ ) සහ Windows, Linux, FreeBSD වගේ operating systems වුනත් monitoring කරන්න පුළුවන්. තව LibreNms
මේ LibreNms Features විදිහට customizable alerts, API access සහ mobile app (Android and iOS) වගේ තව ගොඩක් දේවල් තියනවා.
Install libreNMS
හරි දැන් අපි බලමු LibreNms Install කරන විදිහ ගැන.
මුලින්ම මම මෙතන Root user ට log වෙනවා නැත්තනම් හැමවෙලේම sudo කියල type කරන්න වෙන නිසා. ඊළගට System update කරන් ඉමු.
su
apt update
apt upgrade
ඊළගට අපි Required Packages install කරමු. මෙතැනදී apache,mariadb-server හා python වගේ LibreNms වලට ඕනි කරන Packages install වෙනවා. ඒ හින්ද අපිට apache සහ mariadb වෙනම install කරන්න ඕනි වෙන්නේ නෑ.
apt install software-properties-common
add-apt-repository universe
apt update
apt install acl curl apache2 composer fping git graphviz imagemagick libapache2-mod-fcgid mariadb-client mariadb-server mtr-tiny nmap php7.4-cli php7.4-curl php7.4-fpm php7.4-gd php7.4-json php7.4-mbstring php7.4-mysql php7.4-snmp php7.4-xml php7.4-zip rrdtool snmp snmpd whois python3-pymysql python3-dotenv python3-redis python3-setuptools
By default, MariaDB වල root user ට password එකක් එන්නේ නෑ. දැන් අපි Password එකක් දාල අනිත් basic config ටික කරමු.
mysql_secure_installation
මෙහෙම type කරලා Enter කරපු ගමන් පහල තියෙනවා වගේ list එකක් එයි, එක ඔයාට කැමති විදිහට Y or N යොදල වෙනස්කරගන්න පුළුවන්.
මෙතැනදී මම හැම එකටම Yes (Y) දෙනවා.
-
- root user ට හොද password එකක් දාන්න.
- anonymous users ල remove කරන්න.
- remotely root log එක Disallow කරන්න.
- test database ටික remove කරන්න.
- privilege tables ටික reload කරන්න.
Set root password? [Y/n] y
New password:
Re-enter new password:
Password updated successfully!
Reloading privilege tables..
 ... Success!

Remove anonymous users? [Y/n] y
 ... Success!

Disallow root login remotely? [Y/n] y
 ... Success!

Remove test database and access to it? [Y/n] y
 - Dropping test database...
 ... Success!
 - Removing privileges on test database...
 ... Success!

Reload privilege tables now? [Y/n] y
 ... Success!

Cleaning up...

All done!  If you've completed all of the above steps, your MariaDB
installation should now be secure.

Thanks for using MariaDB!
හරි ඊළගට අපි librenms user ව add කරමු.
useradd librenms -d /opt/librenms -M -r -s "$(which bash)"
දැන් /opt location එකට ගිහින් LibreNMS Download කරගන්න ඕනි.
cd /opt
git clone https://github.com/librenms/librenms.git
ඊළගට librenms user ට /opt/librenms directory එකේ permissions දෙන්න ඕනි.
chown -R librenms:librenms /opt/librenms
chmod 771 /opt/librenms
setfacl -d -m g::rwx /opt/librenms/rrd /opt/librenms/logs /opt/librenms/bootstrap/cache/ /opt/librenms/storage/
setfacl -R -m g::rwx /opt/librenms/rrd /opt/librenms/logs /opt/librenms/bootstrap/cache/ /opt/librenms/storage/
ඊළගට අපි librenms user ට log වෙලා PHP dependencies Install කරන්න ඕනි
su - librenms
./scripts/composer_wrapper.php install --no-dev
exit
proxy එකක් used කරනවනම් ඉස්සල්ල කිව්වා විදිහ වැඩකරන්නේ නැති වෙන්න පුළුවන්. ඒ වෙලාවට composer package ටික manually instrall කරන්න ඕනි.
wget https://getcomposer.org/composer-stable.phar
mv composer-stable.phar /usr/bin/composer
chmod +x /usr/bin/composer
ඊළගට timezone හදන්න ඕනි.එකට මුලින්ම මේ link එකට (https://php.net/manual/en/timezones.php) ගිහින් හරියන timezone එක බලන්න.(eg -: “America/New_York”, “Australia/Brisbane”, “Etc/UTC” ). දැන් එක පහල php.ini file එකේ date.timezone කියන තැනට ඉස්සරහින් දාන්න. timezone එක හරියට යොදන එක ගොඩක් වැදගත් මොකද system alerts වගේ දේවල් වලට time එක හරියට තියෙන්න ඕනි නිසා.
nano /etc/php/7.4/fpm/php.ini
nano /etc/php/7.4/cli/php.ini
මෙතැනදී මම use කරන්නේ nano editor එක නිසා Ctrl + w ඔබල search කරන්න පුළුවන්.(මෙතන උදාහරණයක් විදිහට Etc/UTC timezone එක දානවා.)
[Date]
; Defines the default timezone used by the date functions
; http://php.net/date.timezone
date.timezone = Etc/UTC
අවගේම system timezone එකත් හරියට යොදන්න ඕනි.
timedatectl set-timezone Etc/UTC
දැන් MariaDB එක Configure කරගන්න සහ database එක හදන්න ඕනි.
MariaDB එක Configure කරන්න 50-server.cnf file එකට log වෙන්න.
nano /etc/mysql/mariadb.conf.d/50-server.cnf
මෙතන [mysqld] section එකට පහල ටික add කරන්න.
innodb_file_per_table=1
lower_case_table_names=0
මේතැනදී bind-address කියන තැන Database එකේ address එක තියෙන්නේ “127.0.0.1 ” කියල. ඒ මෙතැනදී මේ vps එකේම DB එක තියෙන නිසා. වෙනම DB server එකක් use කරනවනම් එතනට server ip address එක add කරන්න.
# this is only for the mysqld standalone daemon
[mysqld]

#
# * Basic Settings
#
innodb_file_per_table=1
lower_case_table_names=0

# localhost which is more compatible and is not less secure.
bind-address = 127.0.0.1
DB එක restart කරන්න.
systemctl enable mariadb
systemctl restart mariadb
ඊළගට DB එකට root use ට කලින් දුන්න passwd එක දීල log වෙන්න.
mysql -u root
දැන් DB එක create කරන්න ඕනි මෙතැනදී මම password එක ”password” විදිහට දානවා ලේසියට.හැබැයි මේක use කරද්දී හොද password එකක් දන්න.
CREATE DATABASE librenms CHARACTER SET utf8 COLLATE utf8_unicode_ci;
CREATE USER 'librenms'@'localhost' IDENTIFIED BY 'password';
GRANT ALL PRIVILEGES ON librenms.* TO 'librenms'@'localhost';
FLUSH PRIVILEGES;
exit
ඊළගට PHP-FPM(FastCGI Process Manager) එක Configure කරන්නඕනි.
මෙතැනදී මුලින්ම librenms.conf file එක හදන්න ඕනි.
cp /etc/php/7.4/fpm/pool.d/www.conf /etc/php/7.4/fpm/pool.d/librenms.conf
nano /etc/php/7.4/fpm/pool.d/librenms.conf
මෙතැනදී අපි පහල තියෙන වෙනස්කම් ටික කරන්න ඕනි.
[www] වෙනුවට එතනට [librenms]කියල Add කරන්න.
[librenms]
user සහ group කියන දෙකට “librenms”: කියල add කරන්න.
user = librenms
group = librenms
listen කියන තැනට පහල තියෙන එක add කරන්න.
listen = /run/php-fpm-librenms.sock
; pool name ('www' here)
[librenms]

; Unix user/group of processes
; Note: The user is mandatory. If the group is not set, the default user's group
;       will be used.
user = librenms
group = librenms

; Note: This value is mandatory.
listen = /run/php-fpm-librenms.sock
ඊළගට අපි Web Server එක Configure කරන්න ඕනි. මම මුලින් install කරේ Apache Web Server එක නිසා මම එකේ config කරනවා.
මුලින්ම librenms.conf file එක හදන් ඉන්න ඕනි.
nano /etc/apache2/sites-available/librenms.conf
දැන් ඒ file එක config කරමු. මේකේ ServerName එකට අවශ්යනම් server එකේ නම දන්නා පුළුවන්.
<VirtualHost *:80>
   DocumentRoot /opt/librenms/html/
   ServerName librenms.example.com

   AllowEncodedSlashes NoDecode
   <Directory "/opt/librenms/html/">
     Require all granted
     AllowOverride All
     Options FollowSymLinks MultiViews
   </Directory>

  # Enable http authorization headers
  <IfModule setenvif_module>
    SetEnvIfNoCase ^Authorization$ "(.+)" HTTP_AUTHORIZATION=$1
  </IfModule>

  <FilesMatch ".+\.php$">
    SetHandler "proxy:unix:/run/php-fpm-librenms.sock|fcgi://localhost"
  </FilesMatch>
</VirtualHost>
ඊළගට default site එක disable කරලා librenms site එක enable කරන්න. ඊටපස්සේ Apache Web Server එක restart කරන්න.
a2dissite 000-default
a2enmod proxy_fcgi setenvif rewrite
a2ensite librenms.conf
systemctl restart apache2
systemctl restart php7.4-fpm
ඊළගට lnms command completion එක Enableකරමු.
මේකෙන් සාමාන්ය linux command type කරද්දී tab එබුවම completion වෙනවා වගේ lnms command type කරාමත් completion කරන්න පුළුවන් වෙනවා.
ln -s /opt/librenms/lnms /usr/bin/lnms
cp /opt/librenms/misc/lnms-completion.bash /etc/bash_completion.d/
ඊළගට snmpd Configure කරමු.මේකෙන් මේ install කරන vps එකේ snmp enable කරන්න පුළුවන්.
cp /opt/librenms/snmpd.conf.example /etc/snmp/snmpd.conf
nano /etc/snmp/snmpd.conf
Edit the text which says RANDOMSTRINGGOESHERE and set your own community string.
curl -o /usr/bin/distro https://raw.githubusercontent.com/librenms/librenms-agent/master/snmp/distro
chmod +x /usr/bin/distro
systemctl enable snmpd
systemctl restart snmpd
ඊළගට Cron job එකහදමු.
cp /opt/librenms/librenms.nonroot.cron /etc/cron.d/librenms
දැන් Web installer එක run කරන්න server එකේ IP එක හෝ domain name එකට යන්න.
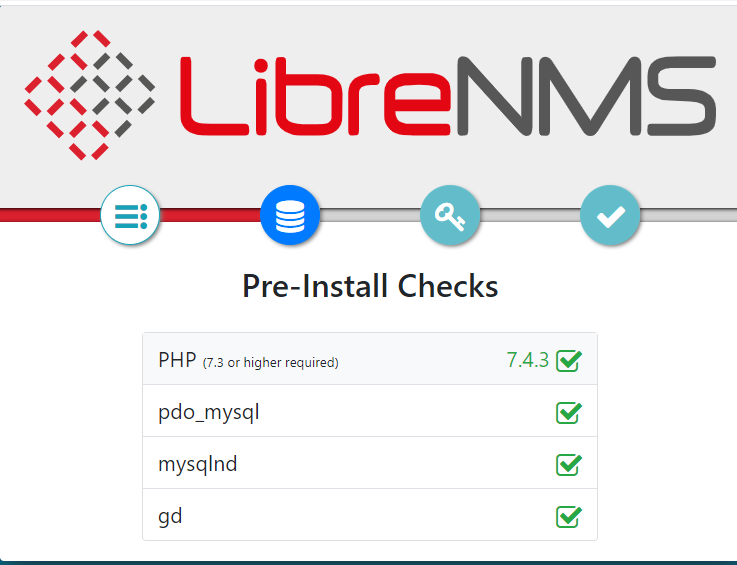
මෙතැනදී අපිට බලාගන්න පුළුවන් අපි අවශ්ය කරන හැමෙකක්ම හරියට install කරලද කියල.
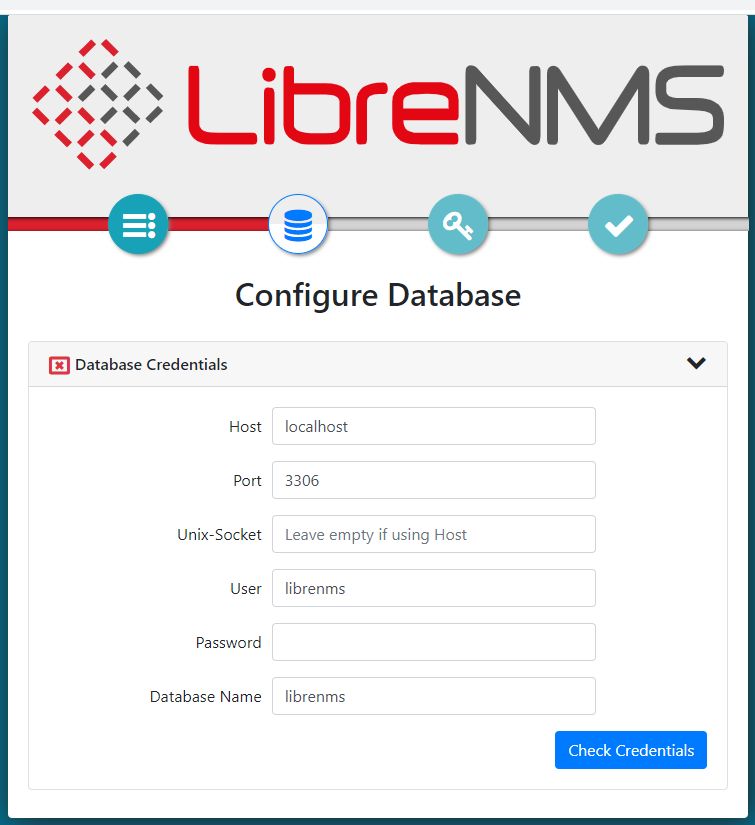
මෙතන කලින් අපි librenms user ට දුන්න password එක දෙන්න ඕනි.
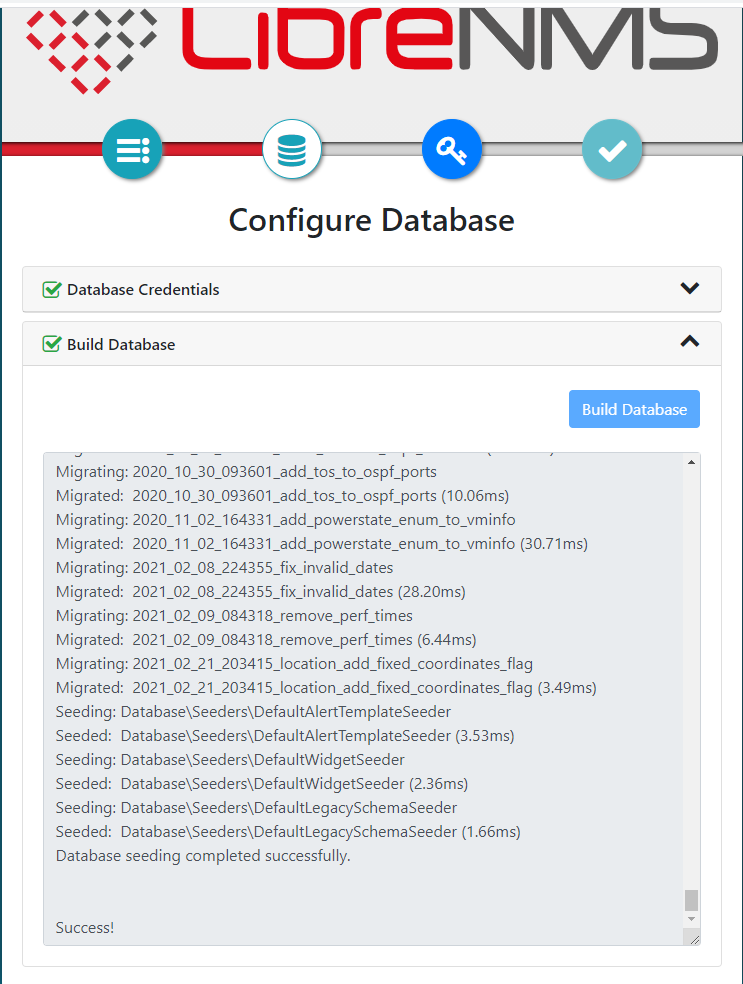
මෙතන Build Database කියල දුන්නම මේ විදිහට එක build වෙනවා.

මෙතැනදී අපි admin user කෙනෙක්ව දාගන්න ඕනි.(password එක හොද එකක් දන්නා මතක තියාගන්න.)

මෙතන vaildate your install කියන එක click කරන්න.
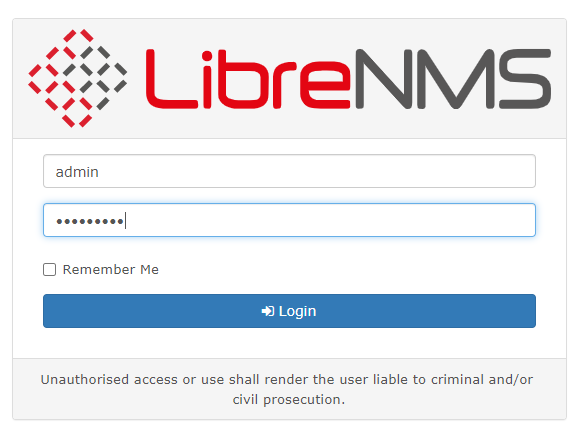
admin user name සහ password ගහල log වෙන්න
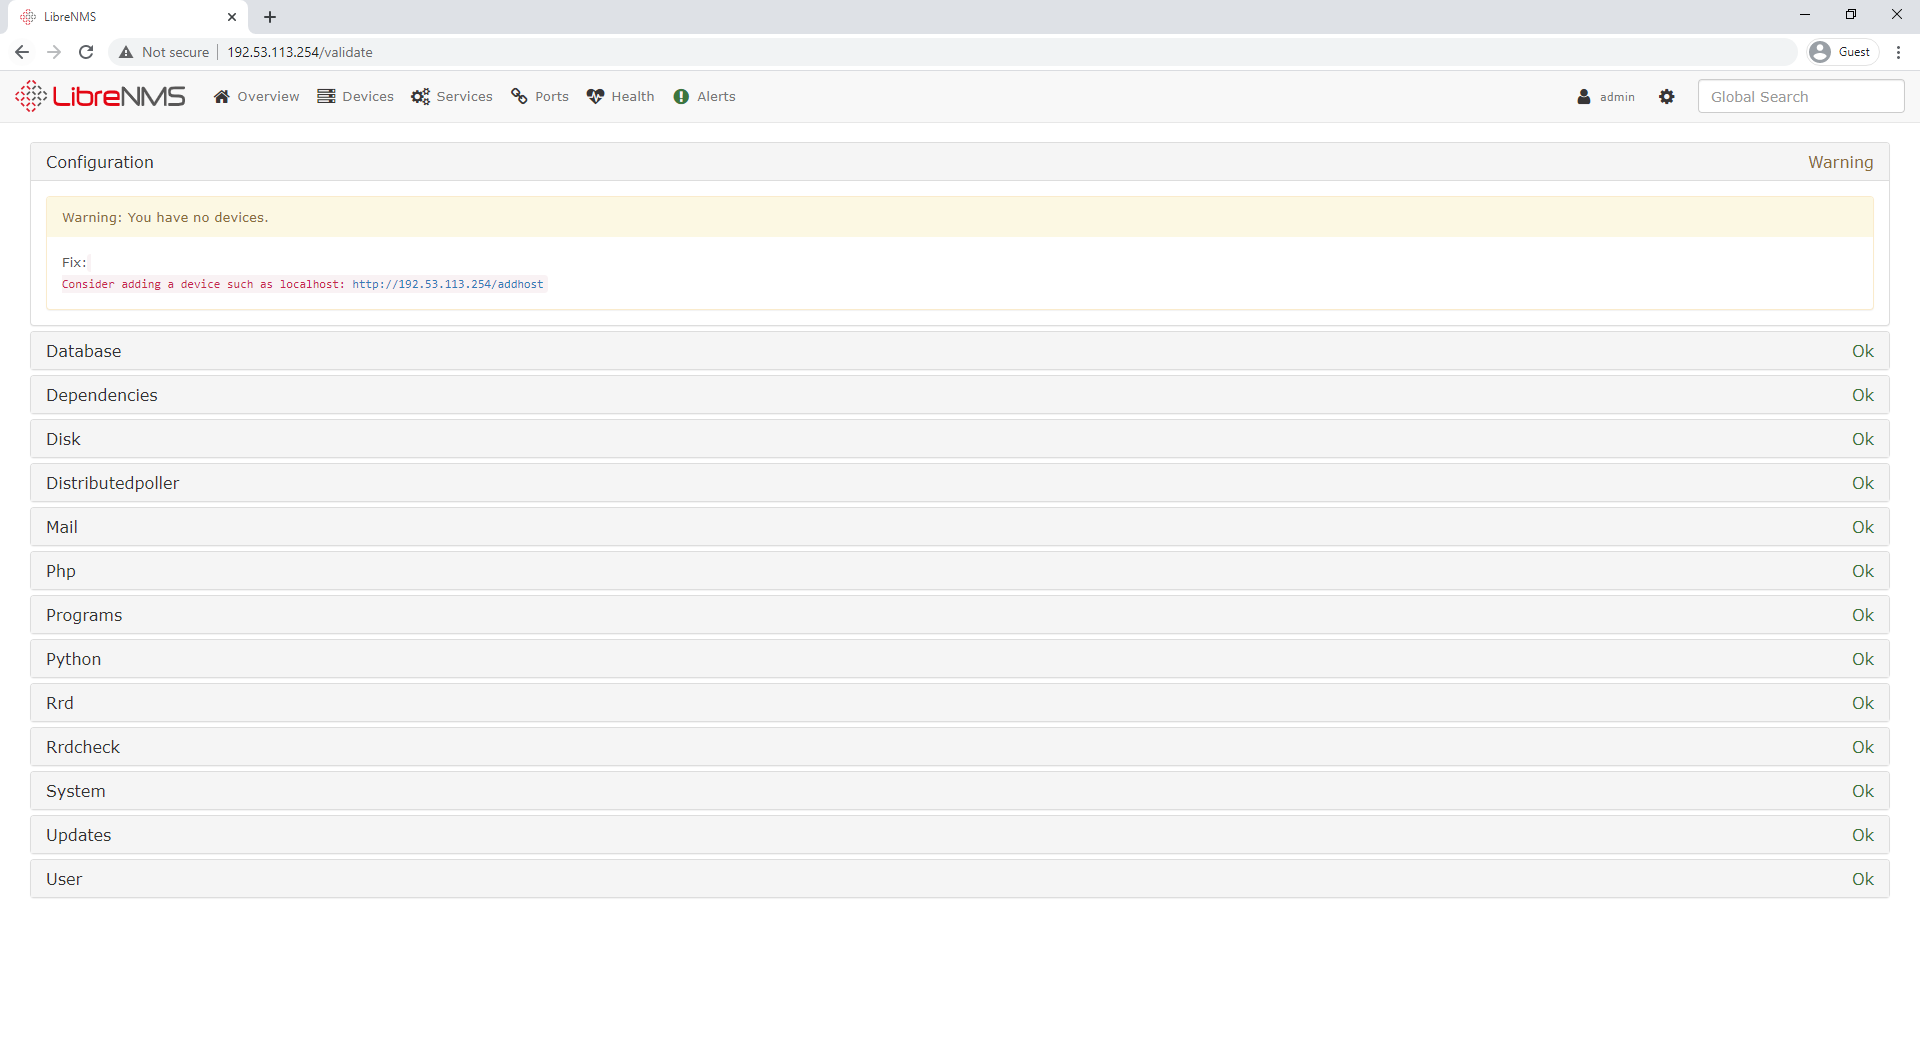
දැන් තියෙන්නේ ඔනිකරන device add කරගන්න එක.
ඊළගට config.php file එකට permissions දෙන්න ඕනි.
chown librenms:librenms /opt/librenms/config.php
මොකක්හරි අවුලක් තියේද බලන්න Troubleshooting කරන්න ඕනිවොනොත්.
sudo su - librenms
./validate.php
Congratulations! දැන් අපි LibreNMS එක ubuntu 20.04 වලට install කරලා ඉවරයි. මම හිතනවා මේ ලිපිය ප්රයෝජනවත් වෙයි කියල.මේගැන අදහස් යෝජනා චෝදනා හෝ අඩුපාඩුවක් තියේනම් commect එකක් දන්නා. එහෙනම් තවත් ලිපියකින් හමුවෙමු.


